<?xml version="1.0" encoding="utf-8"?><feed xmlns="http://www.w3.org/2005/Atom" ><generator uri="https://jekyllrb.com/" version="4.4.1">Jekyll</generator><link href="https://www.robertdeveen.com/feed.xml" rel="self" type="application/atom+xml" /><link href="https://www.robertdeveen.com/" rel="alternate" type="text/html" /><updated>2026-04-18T15:03:42+00:00</updated><id>https://www.robertdeveen.com/feed.xml</id><title type="html">Robert de Veen.com</title><subtitle>Blogs and photos from Robert de Veen.</subtitle><author><name>Robert de Veen</name></author><entry><title type="html">Eurasian Blue Tit</title><link href="https://www.robertdeveen.com/photography/2026/04/18/LEGO-Eurasian-Blue-tit.html" rel="alternate" type="text/html" title="Eurasian Blue Tit" /><published>2026-04-18T00:00:00+00:00</published><updated>2026-04-18T00:00:00+00:00</updated><id>https://www.robertdeveen.com/photography/2026/04/18/LEGO-Eurasian-Blue-tit</id><content type="html" xml:base="https://www.robertdeveen.com/photography/2026/04/18/LEGO-Eurasian-Blue-tit.html"><![CDATA[<p>What have I got sitting on my branch now?!</p>

<p><img src="https://live.staticflickr.com/65535/55215350575_5bdea4730f_h.jpg" alt="Eurasian Blue tit" title="LEGO MOC and real Eurasian Blue Tit" class="image-popup" href="https://live.staticflickr.com/65535/55215350575_2e0fceaf68_k.jpg" /></p>

<!--more-->

<p>The LEGO version of the is from this <a href="https://rebrickable.com/mocs/MOC-221381/BigJudge/eurasian-blue-tit-cyanistes-caeruleus/">Rebrickable Eurasian Blue Tit - Cyanistes caeruleus</a> MOC, the other one is real.</p>

<style>
  .page__hero--overlay {
      background-position: 0 40% !important;
  }
</style>

<p>Created at my kitchen table and the photo is shot in my backyard.</p>]]></content><author><name>Robert de Veen</name></author><category term="Photography" /><category term="LEGO" /><category term="Eurasian Blue Tit" /><category term="Birds" /><category term="Photography" /><category term="Nature" /><summary type="html"><![CDATA[What have I got sitting on my branch now?!]]></summary></entry><entry><title type="html">Using Amazon Bedrock models with Microsoft Agent Framework</title><link href="https://www.robertdeveen.com/aws/2025/11/12/Microsoft-Agent-Framework-with-Amazon-Bedrock.html" rel="alternate" type="text/html" title="Using Amazon Bedrock models with Microsoft Agent Framework" /><published>2025-11-12T14:00:00+00:00</published><updated>2025-11-12T14:00:00+00:00</updated><id>https://www.robertdeveen.com/aws/2025/11/12/Microsoft-Agent-Framework-with-Amazon-Bedrock</id><content type="html" xml:base="https://www.robertdeveen.com/aws/2025/11/12/Microsoft-Agent-Framework-with-Amazon-Bedrock.html"><![CDATA[<p>With the <a href="https://learn.microsoft.com/en-us/agent-framework/overview/agent-framework-overview">Microsoft Agent Framework</a> you can create AI Agents on my favorite programming language .NET but also in Python. The SDK provide various types of agents with, off-course, the out-of-the-box support for Azure AI Foundry. In the successor <a href="https://learn.microsoft.com/en-us/semantic-kernel/overview/">Symantic Kernel</a> there was a <a href="https://learn.microsoft.com/en-us/semantic-kernel/frameworks/agent/agent-types/bedrock-agent?pivots=programming-language-csharp">specific agent</a> type for Amazon Bedrock’s Agent service. But in the new Microsoft Agent Framework, this specific agent type is not yet available.</p>

<!--more-->

<p>The Microsoft Agent Framework support creating agents thats uses the generic <a href="https://platform.openai.com/docs/api-reference/chat/create">OpenAI Chat Completion</a> services. This means that you can use the Microsoft Agent Framework to create agents that uses Amazon Bedrock models by using the <a href="https://docs.aws.amazon.com/bedrock/latest/userguide/inference-chat-completions.html">OpenAI compatible API provided by Amazon Bedrock</a>.</p>

<h2 id="creating-a-bedrock-agent-with-microsoft-agent-framework">Creating a Bedrock Agent with Microsoft Agent Framework</h2>

<p>To create a Bedrock Agent with the Microsoft Agent Framework, you need to configure the <code class="language-plaintext highlighter-rouge">OpenAIClient</code> to use the Bedrock endpoint and provide the necessary Api Key. Below is an example of how to set up a Bedrock Agent using C#:</p>

<div class="language-csharp highlighter-rouge"><div class="highlight"><pre class="highlight"><code><span class="err">#</span><span class="p">:</span><span class="n">package</span> <span class="n">Microsoft</span><span class="p">.</span><span class="n">Agents</span><span class="p">.</span><span class="n">AI</span><span class="p">.</span><span class="n">OpenAI</span><span class="err">@</span><span class="m">1.0</span><span class="p">.</span><span class="m">0</span><span class="p">-</span><span class="n">preview</span><span class="p">.</span><span class="m">251110.2</span>

<span class="k">using</span> <span class="nn">System.ClientModel</span><span class="p">;</span>
<span class="k">using</span> <span class="nn">OpenAI</span><span class="p">;</span>
<span class="k">using</span> <span class="nn">OpenAI.Chat</span><span class="p">;</span>

<span class="n">OpenAIClient</span> <span class="n">client</span> <span class="p">=</span> <span class="k">new</span><span class="p">(</span>
    <span class="k">new</span> <span class="nf">ApiKeyCredential</span><span class="p">(</span><span class="s">"&lt;your_aws_bedrock_api_key&gt;"</span><span class="p">),</span>
    <span class="k">new</span> <span class="nf">OpenAIClientOptions</span><span class="p">()</span>
    <span class="p">{</span>
        <span class="n">Endpoint</span> <span class="p">=</span> <span class="k">new</span> <span class="nf">Uri</span><span class="p">(</span><span class="s">"https://bedrock-runtime.&lt;your_aws_region&gt;.amazonaws.com/openai/v1"</span><span class="p">),</span>
    <span class="p">});</span>

<span class="kt">var</span> <span class="n">chatCompletionClient</span> <span class="p">=</span> <span class="n">client</span><span class="p">.</span><span class="nf">GetChatClient</span><span class="p">(</span><span class="s">"openai.gpt-oss-120b-1:0"</span><span class="p">);</span>

<span class="n">ChatCompletion</span> <span class="n">chatCompletion</span> <span class="p">=</span> <span class="k">await</span> <span class="n">chatCompletionClient</span><span class="p">.</span><span class="nf">CompleteChatAsync</span><span class="p">(</span><span class="s">"Hello, how can I use AWS Bedrock with Microsoft Agent Framework?"</span><span class="p">);</span>

<span class="n">Console</span><span class="p">.</span><span class="nf">WriteLine</span><span class="p">(</span><span class="n">chatCompletion</span><span class="p">.</span><span class="n">Content</span><span class="p">[</span><span class="m">0</span><span class="p">].</span><span class="n">Text</span><span class="p">.</span><span class="nf">Trim</span><span class="p">());</span>
</code></pre></div></div>

<p>Happy building! 🚀</p>]]></content><author><name>Robert de Veen</name></author><category term="AWS" /><category term="AWS" /><category term="Amazon Bedrock" /><category term="Microsoft Agent Framework" /><category term="AI" /><category term="LLM" /><summary type="html"><![CDATA[With the Microsoft Agent Framework you can create AI Agents on my favorite programming language .NET but also in Python. The SDK provide various types of agents with, off-course, the out-of-the-box support for Azure AI Foundry. In the successor Symantic Kernel there was a specific agent type for Amazon Bedrock’s Agent service. But in the new Microsoft Agent Framework, this specific agent type is not yet available.]]></summary></entry><entry><title type="html">Amsterdamse Waterleidingduinen Visit October 2025</title><link href="https://www.robertdeveen.com/photography/2025/10/03/AWD-2025.html" rel="alternate" type="text/html" title="Amsterdamse Waterleidingduinen Visit October 2025" /><published>2025-10-03T14:00:00+00:00</published><updated>2025-10-03T14:00:00+00:00</updated><id>https://www.robertdeveen.com/photography/2025/10/03/AWD-2025</id><content type="html" xml:base="https://www.robertdeveen.com/photography/2025/10/03/AWD-2025.html"><![CDATA[<p>The Amsterdamse Waterleidingduinen is a beautiful nature reserve in the Netherlands. It is home to a variety of wildlife, including fallow deers. In October 2025, I had the opportunity to visit this stunning location and capture some amazing photographs of the landscape and its inhabitants.</p>

<p><img src="https://live.staticflickr.com/65535/54841199235_857fb54aad_h.jpg," alt="Fallow Deer" title="Fallow Deer in Amsterdamse Waterleidingduinen" class="image-popup" href="https://live.staticflickr.com/65535/54841199235_f6980be9cf_k.jpg" /></p>

<p><a href="/albums/2024-10-05-awd/" class="btn btn--primary btn--large">View the Album</a></p>

<style>
  .page__hero--overlay {
      background-position: 0 40% !important;
  }
</style>

<!--more-->]]></content><author><name>Robert de Veen</name></author><category term="Photography" /><category term="Amsterdamse Waterleidingduinen" /><category term="Photography" /><category term="Nature" /><summary type="html"><![CDATA[A visit to the Amsterdamse Waterleidingduinen in October 2025.]]></summary></entry><entry><title type="html">Using AWS SQS and Event Bridge Pipes to send messages to ECS</title><link href="https://www.robertdeveen.com/aws/2025/06/14/AWS-SQS-Pipe-ECS.html" rel="alternate" type="text/html" title="Using AWS SQS and Event Bridge Pipes to send messages to ECS" /><published>2025-06-14T14:00:00+00:00</published><updated>2025-06-14T14:00:00+00:00</updated><id>https://www.robertdeveen.com/aws/2025/06/14/AWS-SQS-Pipe-ECS</id><content type="html" xml:base="https://www.robertdeveen.com/aws/2025/06/14/AWS-SQS-Pipe-ECS.html"><![CDATA[<p>Today I was working on a integration to process message from an AWS Simple Queueing Services (SQS) Queue to a backend services. The specifics of this backend services doesn’t really matter for this post, the only thing relevant is that it using the old-school Windows Communication Framework (WCF). With a custom .NET application written in the beloved C# language, we can communicate with the backend.</p>

<!--more-->

<p>This integration start with a third party putting a message on our queue. Because the amount of message we think this integration would process we would like to make this integration serverless. This means no service running 24-7 that is constantly polling for work to do, but a process that is triggered when a new message has arrived.</p>

<h2 id="integration-overview">Integration overview</h2>

<p><img src="/assets/images/SQS-Pipe-ECS.drawio.svg" alt="Integration using SQS, Event Bridge Pipe and ECS" /></p>

<p>In this post I will show you how to use AWS SQS and EventBridge Pipes to send messages to ECS. The integration consists of the following components:</p>
<ul>
  <li><strong>SQS Queue</strong>: The queue where the third party put the messages. Nothing special about this queue, just a standard SQS queue.</li>
  <li><strong>EventBridge Pipe</strong>: The pipe that connects the SQS queue to the ECS task.</li>
  <li><strong>ECS Task</strong>: The task that processes the messages from the SQS queue. This task is running a custom .NET application that communicates with the backend service using WCF.</li>
</ul>

<h3 id="eventbridge-pipe">EventBridge Pipe</h3>

<p><img src="/assets/images/EventBridge-Pipe-SQS-ECS.png" alt="AWS Event Bridge Pipe, Source is a SQS queue, the target an ECS Cluster Task definition" /></p>

<p>Creating an EventBridge Pipe is a <a href="https://docs.aws.amazon.com/eventbridge/latest/userguide/pipes-get-started.html">straightforward process</a>. The pipe will listen to the SQS queue and trigger the ECS task when a new message arrives. When creating the pipe, you need to specify the source (SQS queue) and the target (ECS task). You can also configure the pipe to filter messages or enrich messages based on certain criteria, but for this example, we will keep it simple and process all messages as they arrive.</p>

<p><img src="/assets/images/EventBridge-Pipe-SQS-Filtering-Enrichment-ECS.png" alt="AWS Event Bridge Pipe, Source is a SQS queue, the target an ECS Cluster Task definition, no filter or enrichment configured." /></p>

<h3 id="cloudformation-template">CloudFormation Template</h3>

<div class="language-yaml highlighter-rouge"><div class="highlight"><pre class="highlight"><code><span class="na">AWSTemplateFormatVersion</span><span class="pi">:</span> <span class="s1">'</span><span class="s">2010-09-09'</span>
<span class="na">Description</span><span class="pi">:</span> <span class="s">CloudFormation template for EventBridge PipeSQS-Pipe-ECS-Integration</span>
<span class="na">Resources</span><span class="pi">:</span>
  <span class="na">MySQSQueue</span><span class="pi">:</span>
    <span class="na">Type</span><span class="pi">:</span> <span class="s">AWS::SQS::Queue</span>
    <span class="na">Properties</span><span class="pi">:</span>
      <span class="na">QueueName</span><span class="pi">:</span> <span class="s">MyQueue</span>

  <span class="na">MyECSCluster</span><span class="pi">:</span>
    <span class="na">Type</span><span class="pi">:</span> <span class="s">AWS::ECS::Cluster</span>
    <span class="na">Properties</span><span class="pi">:</span>
      <span class="na">ClusterName</span><span class="pi">:</span> <span class="s">MyECSCluster</span>

  <span class="na">MyECSTaskDefinition</span><span class="pi">:</span>
    <span class="na">Type</span><span class="pi">:</span> <span class="s">AWS::ECS::TaskDefinition</span>
    <span class="na">Properties</span><span class="pi">:</span>
      <span class="na">Family</span><span class="pi">:</span> <span class="s">MyTaskDefinition</span>
      <span class="na">ContainerDefinitions</span><span class="pi">:</span>
        <span class="pi">-</span> <span class="na">Name</span><span class="pi">:</span> <span class="s">MyContainer</span>
          <span class="na">Image</span><span class="pi">:</span> <span class="s">my-docker-image</span>
          <span class="na">Memory</span><span class="pi">:</span> <span class="m">512</span>
          <span class="na">Cpu</span><span class="pi">:</span> <span class="m">256</span>
          <span class="na">Essential</span><span class="pi">:</span> <span class="kc">true</span>

  <span class="na">MyEventBridgePipe</span><span class="pi">:</span>
    <span class="na">Type</span><span class="pi">:</span> <span class="s">AWS::Events::Pipe</span>
    <span class="na">Properties</span><span class="pi">:</span>
      <span class="na">Name</span><span class="pi">:</span> <span class="s">MyQueueToECSPipe</span>
      <span class="na">DesiredState</span><span class="pi">:</span> <span class="s">RUNNING</span>
      <span class="na">Source</span><span class="pi">:</span> <span class="kt">!GetAtt</span> <span class="s">MySQSQueue.Arn</span>
      <span class="na">Target</span><span class="pi">:</span> <span class="kt">!GetAtt</span> <span class="s">MyECSCluster.Arn</span>
      <span class="na">TargetParameters</span><span class="pi">:</span>
        <span class="na">EcsTaskParameters</span><span class="pi">:</span>
          <span class="na">TaskDefinitionArn</span><span class="pi">:</span> <span class="s">MyECSTaskDefinition.Arn</span>
          <span class="na">TaskCount</span><span class="pi">:</span> <span class="m">1</span>
          <span class="na">NetworkConfiguration</span><span class="pi">:</span>
            <span class="na">awsvpcConfiguration</span><span class="pi">:</span> <span class="pi">{}</span>
          <span class="na">EnableECSManagedTags</span><span class="pi">:</span> <span class="kc">true</span>
          <span class="na">EnableExecuteCommand</span><span class="pi">:</span> <span class="kc">false</span>
</code></pre></div></div>

<p>This (partial complete) CloudFormation template creates the necessary resources for the integration. It creates an SQS queue, an ECS cluster, an ECS task definition, and an EventBridge Pipe that connects the SQS queue to the ECS task.</p>

<p>This Pipe will automatically trigger the ECS task when a new message arrives in the SQS queue. The ECS task will then start up. It doesn’t receive anything from the SQS queue, it will just start up and run the code in the container.</p>

<p>If the Pipe is configured correctly, it will start the ECS task when a new message arrives in the SQS queue. The message is not passed to the ECS task, but the task will start up and run the code in the container. When the container is started, the message is already removed from the SQS queue. This means that the ECS task will not receive the message automatically.</p>

<p>You can pass the message to the ECS task by using <code class="language-plaintext highlighter-rouge">$.body</code> in the template. This will pass the message body to the ECS task as an environment variable. You can then read this environment variable in your code and process the message accordingly.</p>

<div class="language-yaml highlighter-rouge"><div class="highlight"><pre class="highlight"><code>  <span class="na">MyEventBridgePipe</span><span class="pi">:</span>
    <span class="na">Type</span><span class="pi">:</span> <span class="s">AWS::Events::Pipe</span>
    <span class="na">Properties</span><span class="pi">:</span>
      <span class="na">TargetParameters</span><span class="pi">:</span>
        <span class="na">EcsTaskParameters</span><span class="pi">:</span>
          <span class="s">...</span> <span class="c1"># other parameters</span>
          <span class="na">Overrides</span><span class="pi">:</span>
            <span class="na">ContainerOverrides</span><span class="pi">:</span>
              <span class="pi">-</span> <span class="na">Name</span><span class="pi">:</span> <span class="s">MyContainer</span>
                <span class="na">Environment</span><span class="pi">:</span>
                  <span class="pi">-</span> <span class="na">Name</span><span class="pi">:</span> <span class="s">MESSAGE_BODY</span>
                    <span class="na">Value</span><span class="pi">:</span> <span class="s2">"</span><span class="s">$.body"</span>
</code></pre></div></div>

<p>It is also possible to pass the message body as a startup argument to the ECS task. In the <code class="language-plaintext highlighter-rouge">ContainerOverrides</code> section of the <code class="language-plaintext highlighter-rouge">EcsTaskParameters</code>, you can specify the command to run when the container starts. This allows you to pass the message body as an argument to your application.</p>

<div class="language-yaml highlighter-rouge"><div class="highlight"><pre class="highlight"><code>  <span class="na">MyEventBridgePipe</span><span class="pi">:</span>
    <span class="na">Type</span><span class="pi">:</span> <span class="s">AWS::Events::Pipe</span>
    <span class="na">Properties</span><span class="pi">:</span>
      <span class="na">TargetParameters</span><span class="pi">:</span>
        <span class="na">EcsTaskParameters</span><span class="pi">:</span>
          <span class="s">...</span> <span class="c1"># other parameters</span>
          <span class="na">Overrides</span><span class="pi">:</span>
            <span class="na">ContainerOverrides</span><span class="pi">:</span>
              <span class="pi">-</span> <span class="na">Name</span><span class="pi">:</span> <span class="kt">!Ref</span> <span class="s">ContainerName</span>
                <span class="na">Command</span><span class="pi">:</span> 
                  <span class="pi">-</span> <span class="s2">"</span><span class="s">dotnet"</span>
                  <span class="pi">-</span> <span class="s2">"</span><span class="s">/app/Processor.Host.dll"</span>
                  <span class="pi">-</span> <span class="s2">"</span><span class="s">--body"</span>
                  <span class="pi">-</span> <span class="s2">"</span><span class="s">$.body"</span>
</code></pre></div></div>

<h3 id="no-resilience-integration">No resilience integration</h3>

<p>When the Pipe can not start the ECS task because, for example: incorrect configuration, unknown task definition, or not the right permission to do so, it will not delete the message from the SQS queue. This means that if the ECS task fails to start, the message will remain in the SQS queue and can be processed again later. However, if the Pipe successfully starts the ECS task, it will delete the message from the SQS queue.</p>

<blockquote>
  <p><strong>Warning</strong>: When the Pipe has successfully started the ECS task, it will not wait for the task to complete but it will delete the message from the SQS queue. This means that if the ECS task fails to process the message, the message will be lost. This will make this integration not resilient, a failure in the ECS task will not result in the message being retried.</p>
</blockquote>

<h2 id="conclusion">Conclusion</h2>

<p>This is not a resilient integration, but a simple way to start a process based on a message that is send to an SQS queue using EventBridge Pipes and ECS. The integration is serverless, meaning that there is no need to run a service 24-7 that is constantly polling for work to do. Instead, the ECS task is triggered when a new message arrives in the SQS queue, making it a cost-effective solution for processing messages.</p>]]></content><author><name>Robert de Veen</name></author><category term="AWS" /><category term="AWS" /><category term="SQS" /><category term="Event Bridge" /><category term="Pipes" /><category term="ECS" /><summary type="html"><![CDATA[Learn how to use AWS SQS and EventBridge Pipes to send messages to ECS.]]></summary></entry><entry><title type="html">Robin</title><link href="https://www.robertdeveen.com/photography/2025/03/23/Robin.html" rel="alternate" type="text/html" title="Robin" /><published>2025-03-23T14:00:00+00:00</published><updated>2025-03-23T14:00:00+00:00</updated><id>https://www.robertdeveen.com/photography/2025/03/23/Robin</id><content type="html" xml:base="https://www.robertdeveen.com/photography/2025/03/23/Robin.html"><![CDATA[<p><img src="https://live.staticflickr.com/65535/54894482225_7fa3cd4b4e_h.jpg," alt="Robin" title="Robin" class="image-popup" href="https://live.staticflickr.com/65535/54894482225_a5c91c0a70_k.jpg" /></p>

<p><a href="/albums/2011-04-23-birds/" class="btn btn--primary btn--large">View the Album</a></p>]]></content><author><name>Robert de Veen</name></author><category term="Photography" /><category term="Birds" /><category term="Photography" /><category term="Nature" /><summary type="html"><![CDATA[]]></summary></entry><entry><title type="html">Lint your Bicep and Bicepparam files with GitHub Workflow</title><link href="https://www.robertdeveen.com/azure/2024/01/23/Bicep-Linter-GitHub-Workflow.html" rel="alternate" type="text/html" title="Lint your Bicep and Bicepparam files with GitHub Workflow" /><published>2024-01-23T14:00:00+00:00</published><updated>2024-01-23T14:00:00+00:00</updated><id>https://www.robertdeveen.com/azure/2024/01/23/Bicep-Linter-GitHub-Workflow</id><content type="html" xml:base="https://www.robertdeveen.com/azure/2024/01/23/Bicep-Linter-GitHub-Workflow.html"><![CDATA[<p>Linters are a very powerfull tool to validate if your code is correct. With the new <code class="language-plaintext highlighter-rouge">az bicep lint --file $file</code> command you can validate if your Bicep and Bicepparam files are correct. This command is available in the <a href="https://learn.microsoft.com/en-us/cli/azure/bicep?view=azure-cli-latest#az-bicep-lint">Azure CLI</a> and can be used in a GitHub Action.</p>

<!--more-->

<p>When changing the Bicep files in a pull request, you can use the <code class="language-plaintext highlighter-rouge">az bicep lint --file $file</code> command to validate the Bicep files. This command will validate the syntax of the Bicep files and will also validate if the resources are valid. This is a great way to validate your Bicep files before deploying them to Azure.</p>

<p>When adding or removing a parameter from the Bicep template, I often forget to change all the Bicepparam files and when deploying to the Production environment in Azure, the deployment wiil fail because the Bicepparam file isn’t correct. To prevent this, I created a GitHub Workflow that will validate the Bicep and the Bicepparam files when a pull request is created or updated. This way, I can’t forget to update the Bicepparam files.</p>

<h2 id="the-bicep-linter-github-workflow-file">The Bicep Linter GitHub Workflow file</h2>

<div class="language-yaml highlighter-rouge"><div class="highlight"><pre class="highlight"><code><span class="na">name</span><span class="pi">:</span> <span class="s">🎗️ Bicep Linter</span>

<span class="na">on</span><span class="pi">:</span>
  <span class="na">pull_request</span><span class="pi">:</span>
    <span class="na">types</span><span class="pi">:</span> <span class="pi">[</span><span class="nv">opened</span><span class="pi">,</span> <span class="nv">reopened</span><span class="pi">,</span> <span class="nv">synchronize</span><span class="pi">,</span> <span class="nv">edited</span><span class="pi">,</span> <span class="nv">ready_for_review</span><span class="pi">]</span>

  <span class="na">workflow_dispatch</span><span class="pi">:</span>

<span class="na">permissions</span><span class="pi">:</span>
  <span class="na">id-token</span><span class="pi">:</span> <span class="s">write</span>
  <span class="na">contents</span><span class="pi">:</span> <span class="s">write</span>
  <span class="na">actions</span><span class="pi">:</span> <span class="s">read</span>

<span class="na">concurrency</span><span class="pi">:</span>
  <span class="na">group</span><span class="pi">:</span> <span class="s">$-$</span>
  <span class="na">cancel-in-progress</span><span class="pi">:</span> <span class="kc">true</span>

<span class="na">jobs</span><span class="pi">:</span>
  <span class="na">lint</span><span class="pi">:</span>
    <span class="na">name</span><span class="pi">:</span> <span class="s">Lint Bicep and Bicepparam files</span>
    <span class="na">environment</span><span class="pi">:</span> <span class="s">AZURE</span>
    <span class="na">runs-on</span><span class="pi">:</span> <span class="s">ubuntu-latest</span>

    <span class="na">steps</span><span class="pi">:</span>
      <span class="pi">-</span> <span class="na">name</span><span class="pi">:</span> <span class="s">Checkout code</span>
        <span class="na">uses</span><span class="pi">:</span> <span class="s">actions/checkout@v4</span>
        <span class="na">with</span><span class="pi">:</span>
          <span class="na">fetch-depth</span><span class="pi">:</span> <span class="m">0</span>

      <span class="pi">-</span> <span class="na">name</span><span class="pi">:</span> <span class="s">Lint Bicep and Bicepparam files</span>
        <span class="na">run</span><span class="pi">:</span> <span class="pi">|</span>
          <span class="s">az bicep install</span>
          <span class="s">success="true"</span>

          <span class="s">CHANGED_FOLDERS=$(git diff HEAD~1 --name-only | xargs dirname)</span>
          <span class="s">echo "📂 Changed folders:"</span>
          <span class="s">echo $CHANGED_FOLDERS</span>

          <span class="s">FILES=$(find $CHANGED_FOLDERS \( -name "*.bicep" -o -name "*.bicepparam" \))</span>
          <span class="s">echo "🔍 Files to lint:"</span>
          <span class="s">echo $FILES</span>

          <span class="s">for file in $FILES; do</span>
          <span class="s">{ # 'try' block</span>
            <span class="s">echo "🎗️ Linting $file" &amp;&amp; az bicep lint --file $file</span>
          <span class="s">} || { # 'catch' block</span>
            <span class="s">success="false"</span>
          <span class="s">}</span>
          <span class="s">done</span>

          <span class="s">if [ "$success" = "false" ]; then</span>
            <span class="s">echo "::error::❌ Linting of the Bicep files failed."</span>
            <span class="s">exit 1;</span>
          <span class="s">fi;</span>
</code></pre></div></div>

<h3 id="checkout-code">Checkout code</h3>

<p>To only Lint the files that has been changed, and not Lint the entire repository, I use the <code class="language-plaintext highlighter-rouge">actions/checkout@v4</code> action with the <code class="language-plaintext highlighter-rouge">fetch-depth: 0</code> parameter to fetch all history for all branches and tags. This way, the <code class="language-plaintext highlighter-rouge">git diff</code> command can be used to get the changed files.</p>

<h3 id="get-changed-files">Get changed files</h3>

<p>With the <code class="language-plaintext highlighter-rouge">git diff HEAD~1 --name-only</code> command, I get all the changed files in the pull request. The <code class="language-plaintext highlighter-rouge">--name-only</code> parameter will only return the file names and not the content of the files. The <code class="language-plaintext highlighter-rouge">HEAD~1</code> parameter will compare the changed files with the main branch. This way, only the changed files in the pull request will be returned.</p>

<h3 id="get-the-changed-folder">Get the changed folder</h3>

<p>Now we only have the files that has been changed, with the <code class="language-plaintext highlighter-rouge">xargs dirname</code> command, we can get the folders of the changed files. Because the Bicep file has change, the Bicepparam files in the same folder should be validated as well.</p>

<h3 id="find-the-bicep-and-bicepparam-files">Find the Bicep and Bicepparam files</h3>

<p>With the <code class="language-plaintext highlighter-rouge">find $CHANGED_FOLDERS \( -name "*.bicep" -o -name "*.bicepparam" \)</code> command we get all the Bicep and Bicepparam files in the folders that has been changed. The <code class="language-plaintext highlighter-rouge">-o</code> parameter is a logical OR, so we get all the files that ends with <code class="language-plaintext highlighter-rouge">.bicep</code> or <code class="language-plaintext highlighter-rouge">.bicepparam</code>.</p>

<h3 id="lint-the-bicep-and-bicepparam-files">Lint the Bicep and Bicepparam files</h3>

<p>Let’s Lint the files! With a <code class="language-plaintext highlighter-rouge">for</code> loop, we can loop through all the files and run the <code class="language-plaintext highlighter-rouge">az bicep lint --file $file</code> command. The <code class="language-plaintext highlighter-rouge">--file</code> parameter is the file that needs to be linted.</p>]]></content><author><name>Robert de Veen</name></author><category term="Azure" /><category term="Azure" /><category term="Bicep" /><category term="GitHub" /><summary type="html"><![CDATA[Linters are a very powerfull tool to validate if your code is correct. With the new az bicep lint --file $file command you can validate if your Bicep and Bicepparam files are correct. This command is available in the Azure CLI and can be used in a GitHub Action.]]></summary></entry><entry><title type="html">Create a (free!) App Services Managed Certificates with Bicep</title><link href="https://www.robertdeveen.com/azure/2023/10/29/App-Services-Managed-Certificates.html" rel="alternate" type="text/html" title="Create a (free!) App Services Managed Certificates with Bicep" /><published>2023-10-29T14:00:00+00:00</published><updated>2023-10-29T14:00:00+00:00</updated><id>https://www.robertdeveen.com/azure/2023/10/29/App-Services-Managed-Certificates</id><content type="html" xml:base="https://www.robertdeveen.com/azure/2023/10/29/App-Services-Managed-Certificates.html"><![CDATA[<p>An certificates in Azure App Services is bind to an host name, this can be an apex (or naked) domain (<a href="https://robertdeveen.com">https://robertdeveen.com</a>) or a subdomain (<a href="https://www.robertdeveen.com">https://www.robertdeveen.com</a> or <a href="https://subdomain.robertdeveen.com">https://subdomain.robertdeveen.com</a>), or a combination of these two (for example one certificate for <a href="https://robertdeveen.com">https://robertdeveen.com</a> and <a href="https://www.robertdeveen.com">https://www.robertdeveen.com</a>).</p>

<p>To create an App Services Managed Certificate there are two ways to create a certificate with Bicep. One for a apex domain and one for an subdomain. The validation of the ownership of the domain is the main difference. To generate a certificate the certificate authority would like to validate that the domain you try to get a certificate for is yours. That you are the owner of that (sub)domain name.</p>

<!--more-->

<p>As a prerequisite you need to have an App Service Plan and an App Service or Function App with a custom domain ready. The Web App does not have a valid certificate already configured.</p>

<h2 id="create-a-host-name-binding-without-a-certificate">Create a Host Name binding without a certificate</h2>

<figure class="highlight"><pre><code class="language-bicep" data-lang="bicep"><span class="k">param</span> <span class="n">customHostname</span> <span class="kt">string</span> <span class="p">=</span> <span class="s1">'www.robertdeveen.com'</span>
<span class="k">param</span> <span class="n">webAppName</span> <span class="kt">string</span> <span class="p">=</span> <span class="s1">'robertdeveen'</span>

<span class="k">resource</span> <span class="n">hostNameBindingWithoutCertificate</span> <span class="s1">'Microsoft.Web/sites/hostNameBindings@2022-03-01'</span> <span class="p">=</span> <span class="pi">{</span>
  <span class="py">name</span><span class="p">:</span> <span class="s1">'</span><span class="si">${</span><span class="n">webAppName</span><span class="si">}</span><span class="s1">/</span><span class="si">${</span><span class="n">customHostname</span><span class="si">}</span><span class="s1">'</span>
  <span class="py">properties</span><span class="p">:</span> <span class="pi">{</span>
    <span class="py">siteName</span><span class="p">:</span> <span class="n">webAppName</span>
    <span class="py">hostNameType</span><span class="p">:</span> <span class="s1">'Verified'</span>
    <span class="py">azureResourceType</span><span class="p">:</span> <span class="s1">'Website'</span>
    <span class="py">azureResourceName</span><span class="p">:</span> <span class="n">webAppName</span>
    <span class="py">customHostNameDnsRecordType</span><span class="p">:</span> <span class="s1">'CName'</span>
    <span class="py">sslState</span><span class="p">:</span> <span class="s1">'Disabled'</span>
  <span class="pi">}</span>
<span class="pi">}</span></code></pre></figure>

<h2 id="create-a-app-services-managed-certificate-for-a-subdomain">Create a App Services Managed Certificate for a subdomain</h2>

<h3 id="create-a-cname-record">Create a CName record</h3>

<p>In the DNS Zone, create a CName record pointing to *.azurewebsite.net. This is needed for the validation of the ownership of the domain.</p>

<table>
  <thead>
    <tr>
      <th>Type</th>
      <th>Record</th>
      <th>Value</th>
    </tr>
  </thead>
  <tbody>
    <tr>
      <td>CNAME</td>
      <td>www.robertdeveen.com</td>
      <td>robertdeveen.azurewebsites.net</td>
    </tr>
  </tbody>
</table>

<h3 id="create-a-app-services-managed-certificate">Create a App Services Managed Certificate</h3>

<figure class="highlight"><pre><code class="language-bicep" data-lang="bicep"><span class="k">param</span> <span class="n">canonicalName</span> <span class="kt">string</span> <span class="p">=</span> <span class="s1">'www.robertdeveen.com'</span>
<span class="k">param</span> <span class="n">appServicePlanName</span> <span class="kt">string</span> <span class="p">=</span> <span class="s1">'robertdeveen-plan'</span>
<span class="k">param</span> <span class="n">location</span> <span class="kt">string</span> <span class="p">=</span> <span class="s1">'westeurope'</span>

<span class="k">resource</span> <span class="n">appServicePlan</span> <span class="s1">'Microsoft.Web/serverfarms@2022-03-01'</span> <span class="k">existing</span> <span class="p">=</span>  <span class="pi">{</span>
  <span class="py">name</span><span class="p">:</span> <span class="n">appServicePlanName</span>
<span class="pi">}</span>

<span class="k">resource</span> <span class="n">certificate</span> <span class="s1">'Microsoft.Web/certificates@2022-03-01'</span> <span class="p">=</span> <span class="pi">{</span>
  <span class="py">name</span><span class="p">:</span> <span class="s1">'</span><span class="si">${</span><span class="n">canonicalName</span><span class="si">}</span><span class="s1">-certificate'</span>
  <span class="py">location</span><span class="p">:</span> <span class="n">location</span>
  <span class="py">properties</span><span class="p">:</span> <span class="pi">{</span>
    <span class="py">serverFarmId</span><span class="p">:</span> <span class="n">appServicePlanResourceId</span>
    <span class="c1">// domainValidationMethod: 'cname-delegation' // or 'http-token'</span>
    <span class="py">hostNames</span><span class="p">:</span> <span class="p">[</span> <span class="n">canonicalName</span> <span class="p">]</span>
    <span class="py">canonicalName</span><span class="p">:</span> <span class="n">canonicalName</span>
  <span class="pi">}</span>
<span class="pi">}</span></code></pre></figure>

<blockquote>
  <p>Note: The documentation is not clear about the meaning of the <code class="language-plaintext highlighter-rouge">domainValidationMethod</code> field, it is a string. But the value that is accepted should be <code class="language-plaintext highlighter-rouge">cname-delegation</code> or <code class="language-plaintext highlighter-rouge">http-token</code>. Other values give the error message: <strong>“The parameter Properties.DomainValidationMethod has an invalid value.”</strong>
The value <code class="language-plaintext highlighter-rouge">cname-delegation</code> is the only one working these days. The value <code class="language-plaintext highlighter-rouge">http-token</code> is not working anymore and just waiting a long time to end. The best solution is to not add that field.</p>
</blockquote>

<h2 id="create-a-app-services-managed-certificate-for-an-apex-domain">Create a App Services Managed Certificate for an apex domain</h2>

<h3 id="create-a-a-record">Create a A record</h3>

<p>In the DNS Zone, create an A records pointing to the IP address of the webapp. This is needed for the validation of the ownership of the domain.</p>

<table>
  <thead>
    <tr>
      <th>Type</th>
      <th>Record</th>
      <th>Value</th>
    </tr>
  </thead>
  <tbody>
    <tr>
      <td>A</td>
      <td>robertdeveen.com</td>
      <td>IP-address-of-webapp</td>
    </tr>
  </tbody>
</table>

<figure class="highlight"><pre><code class="language-bicep" data-lang="bicep"><span class="k">param</span> <span class="n">canonicalName</span> <span class="kt">string</span> <span class="p">=</span> <span class="s1">'robertdeveen.com'</span>
<span class="k">param</span> <span class="n">location</span> <span class="kt">string</span> <span class="p">=</span> <span class="s1">'westeurope'</span>

<span class="k">resource</span> <span class="n">nakedCertificate</span> <span class="s1">'Microsoft.Web/certificates@2022-09-01'</span> <span class="p">=</span> <span class="pi">{</span>
  <span class="py">name</span><span class="p">:</span> <span class="s1">'</span><span class="si">${</span><span class="n">canonicalName</span><span class="si">}</span><span class="s1">-certificate'</span>
  <span class="py">location</span><span class="p">:</span> <span class="n">location</span>
  <span class="py">properties</span><span class="p">:</span> <span class="pi">{</span>
    <span class="py">serverFarmId</span><span class="p">:</span> <span class="n">appServicePlan</span><span class="p">.</span><span class="n">id</span>
    <span class="py">canonicalName</span><span class="p">:</span> <span class="n">canonicalName</span>
  <span class="pi">}</span>
<span class="pi">}</span></code></pre></figure>

<h2 id="create-a-app-services-managed-certificate-for-an-apex-and-subdomain">Create a App Services Managed Certificate for an apex and subdomain</h2>

<p><strong>THIS DOESN’T WORK!</strong> The documentation is not clear about this, but it is not possible to create a certificate for an apex and subdomain at the same time. You need to create two certificates, one for the apex and one for the subdomain.</p>

<figure class="highlight"><pre><code class="language-bicep" data-lang="bicep"><span class="c1">// param canonicalName string = 'robertdeveen.com'</span>
<span class="c1">// param hostNames = [ 'www.robertdeveen.com', 'robertdeveen.com' ]</span>
<span class="c1">// param location string = 'westeurope'</span>

<span class="c1">// resource nakedCertificate 'Microsoft.Web/certificates@2022-09-01' = {</span>
<span class="c1">//   name: '${canonicalName}-certificate'</span>
<span class="c1">//   location: location</span>
<span class="c1">//   properties: {</span>
<span class="c1">//     serverFarmId: appServicePlan.id</span>
<span class="c1">//     hostNames: [ hostNames ]</span>
<span class="c1">//     canonicalName: canonicalName</span>
<span class="c1">//   }</span>
<span class="c1">// }</span></code></pre></figure>

<h2 id="bind-certificate-to-the-host-name">Bind certificate to the host name</h2>

<p>We need to use a module to enable the certificate on the host name, as Bicep/ARM forbids using resource with this same type-name combination twice in one deployment.</p>

<figure class="highlight"><pre><code class="language-bicep" data-lang="bicep"><span class="k">module</span> <span class="n">hostnameBindingWithCertificate</span> <span class="s1">'./modules/hostname-binding.Bicep'</span> <span class="p">=</span> <span class="pi">{</span>
  <span class="py">name</span><span class="p">:</span> <span class="s1">'</span><span class="si">${</span><span class="n">customHostname</span><span class="si">}</span><span class="s1">-hostnamebinding'</span>
  <span class="py">params</span><span class="p">:</span> <span class="pi">{</span>
    <span class="py">certificateThumbprint</span><span class="p">:</span> <span class="n">certificate</span><span class="p">.</span><span class="n">outputs</span><span class="p">.</span><span class="n">thumbprint</span>
    <span class="py">customHostname</span><span class="p">:</span> <span class="n">customHostname</span>
    <span class="py">webAppName</span><span class="p">:</span> <span class="n">webAppName</span>
  <span class="pi">}</span>
<span class="pi">}</span></code></pre></figure>

<h3 id="modulehostname-bindingbicep"><code class="language-plaintext highlighter-rouge">./module/hostname-binding.Bicep</code></h3>

<figure class="highlight"><pre><code class="language-bicep" data-lang="bicep"><span class="k">resource</span> <span class="n">hostNameBindingWithCertificate</span> <span class="s1">'Microsoft.Web/sites/hostNameBindings@2022-03-01'</span> <span class="p">=</span> <span class="pi">{</span>
  <span class="py">name</span><span class="p">:</span> <span class="s1">'</span><span class="si">${</span><span class="n">webAppName</span><span class="si">}</span><span class="s1">/</span><span class="si">${</span><span class="n">customHostname</span><span class="si">}</span><span class="s1">'</span>
  <span class="py">properties</span><span class="p">:</span> <span class="pi">{</span>
    <span class="py">siteName</span><span class="p">:</span> <span class="n">webAppName</span>
    <span class="py">sslState</span><span class="p">:</span> <span class="s1">'SniEnabled'</span>
    <span class="py">thumbprint</span><span class="p">:</span> <span class="n">certificateThumbprint</span>
  <span class="pi">}</span>
<span class="pi">}</span></code></pre></figure>]]></content><author><name>Robert de Veen</name></author><category term="Azure" /><category term="Azure" /><category term="Bicep" /><summary type="html"><![CDATA[An certificates in Azure App Services is bind to an host name, this can be an apex (or naked) domain (https://robertdeveen.com) or a subdomain (https://www.robertdeveen.com or https://subdomain.robertdeveen.com), or a combination of these two (for example one certificate for https://robertdeveen.com and https://www.robertdeveen.com). To create an App Services Managed Certificate there are two ways to create a certificate with Bicep. One for a apex domain and one for an subdomain. The validation of the ownership of the domain is the main difference. To generate a certificate the certificate authority would like to validate that the domain you try to get a certificate for is yours. That you are the owner of that (sub)domain name.]]></summary></entry><entry><title type="html">Connect Home Assistant to Azure Event Grid MQTT Broker</title><link href="https://www.robertdeveen.com/azure/2023/06/11/HomeAssistant-Azure-Event-Grid-MQTT.html" rel="alternate" type="text/html" title="Connect Home Assistant to Azure Event Grid MQTT Broker" /><published>2023-06-11T14:00:00+00:00</published><updated>2023-06-11T14:00:00+00:00</updated><id>https://www.robertdeveen.com/azure/2023/06/11/HomeAssistant-Azure-Event-Grid-MQTT</id><content type="html" xml:base="https://www.robertdeveen.com/azure/2023/06/11/HomeAssistant-Azure-Event-Grid-MQTT.html"><![CDATA[<p>The <a href="https://learn.microsoft.com/en-us/azure/event-grid/mqtt-overview">Azure Event Grid now supports MQTT</a> as a protocol for publishing events. This is great news for Home Assistant users as it allows us to connect Home Assistant to Azure Event Grid. This blog post will show you how to connect Home Assistant to Azure Event Grid using MQTT.</p>

<!--more-->

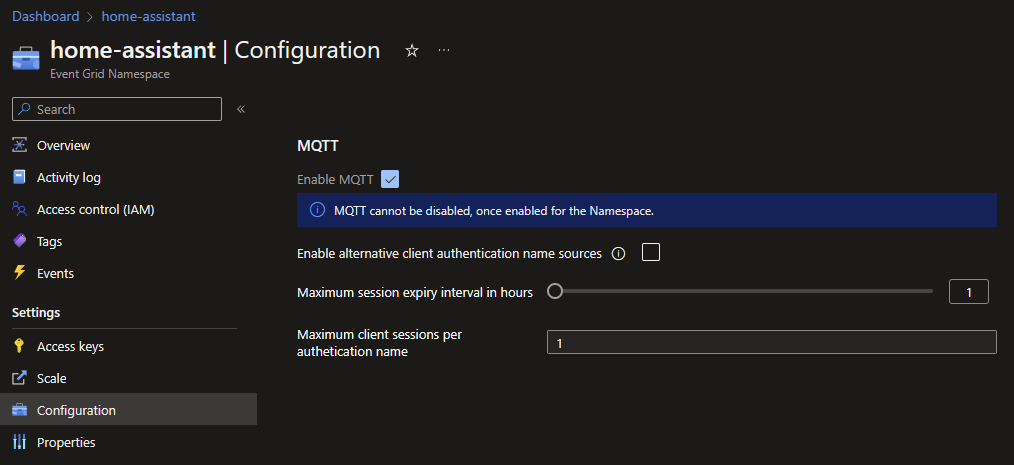
<h2 id="create-an-azure-event-grid-namespace-with-mqtt-enabled">Create an Azure Event Grid Namespace with MQTT enabled</h2>

<p>First we need to create a new Azure Event Grid namespace or use an existing one and <strong>enable MQTT</strong> on the namespace. See the <a href="https://learn.microsoft.com/en-us/azure/event-grid/create-view-manage-namespaces#enable-mqtt">Azure documentation</a> for more information on how to do this.</p>

<p><img src="/assets/images/enabling-mqtt.png" alt="Enable MQTT" class="image-popup" href="/assets/images/enabling-mqtt.png" /></p>

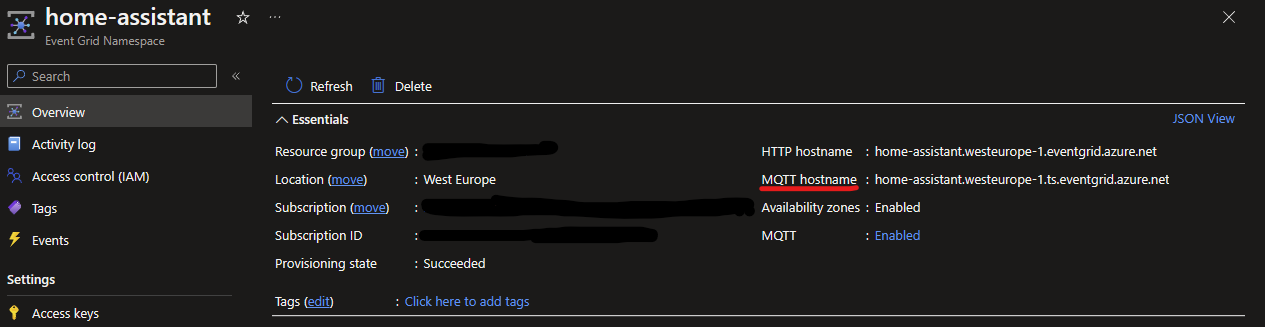
<p>The broker address can be found in the Azure Portal, go to the “Overview” page of the Event Grid Namespace and find the MQTT Hostname. Remember this hostname, we need it later when we configure the MQTT integration in Home Assistant.</p>

<p><img src="/assets/images/EventGridNamespace-Overview.png" alt="Event Grid Namespace Overview" class="image-popup" href="/assets/images/EventGridNamespace-Overview.png" /></p>

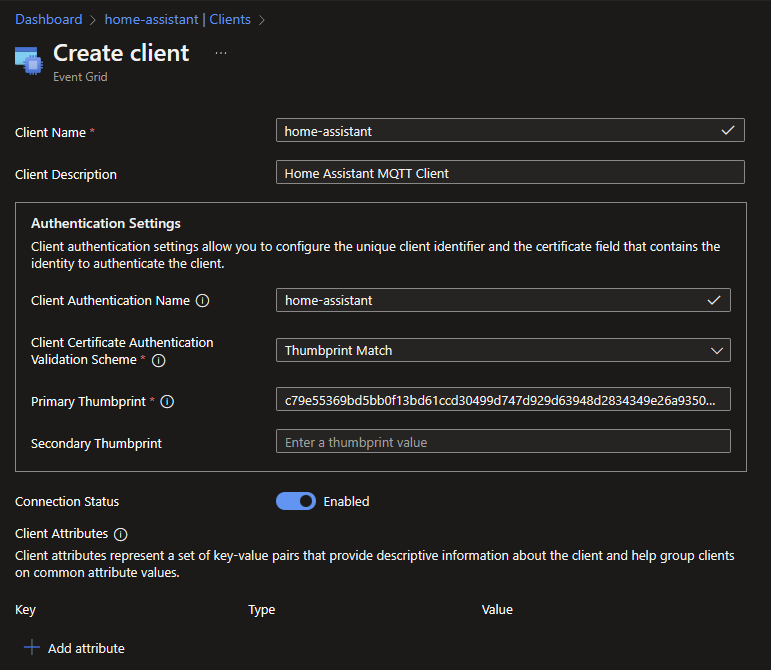
<h2 id="create-a-client-in-azure-event-grid-mqtt">Create a client in Azure Event Grid MQTT</h2>

<p>Then we need to create a client in Azure Event Grid MQTT. This can be done using the Azure Portal or with the Azure CLI. How this can be done is described in the <a href="https://learn.microsoft.com/en-us/azure/event-grid/mqtt-certificate-chain-client-authentication">Azure documentation</a>. Make sure that you select “Thumbprint Match” as the authentication type when you use a self-signed certificate. Remember the Client Authentication Name. We need it later when we configure the MQTT integration in Home Assistant.</p>

<p><img src="/assets/images/mqtt-client-metadata-thumbprint.png" alt="Create client" class="image-popup" href="/assets/images/mqtt-client-metadata-thumbprint.png" /></p>

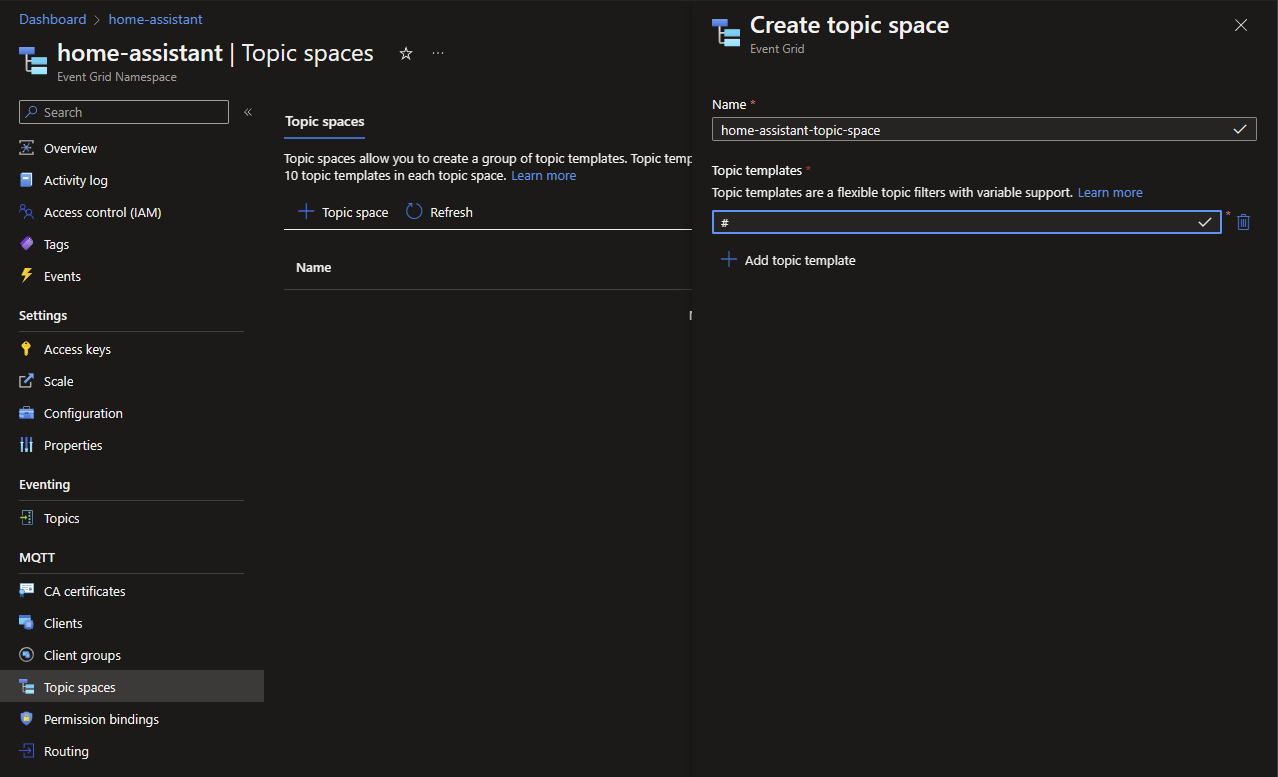
<h3 id="create-a-topic-space">Create a Topic Space</h3>

<p>Create a new Topic Space with a topic name of your choice. Add a Topic Template and enable all topics by entering <code class="language-plaintext highlighter-rouge">#</code> as a template.</p>

<p><img src="/assets/images/create-topic-space.png" alt="Create a Topic Space" class="image-popup" href="/assets/images/create-topic-space.png" /></p>

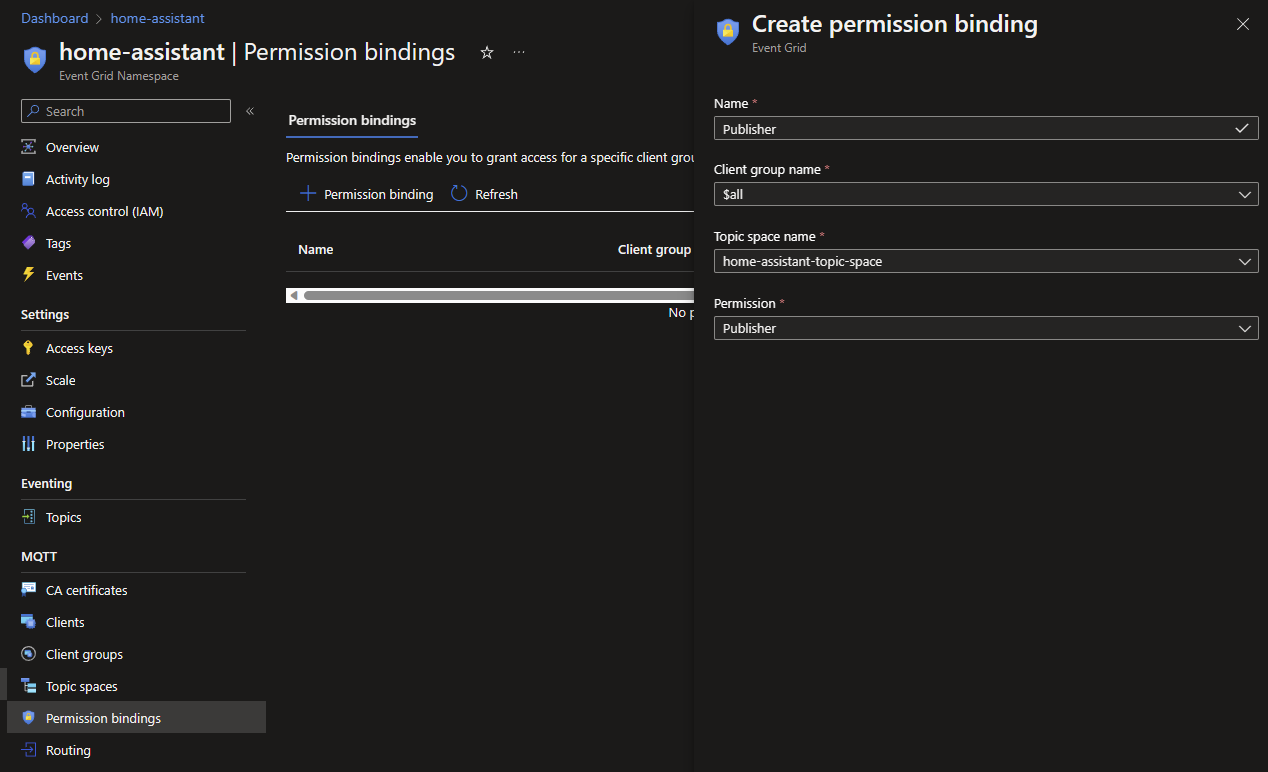
<h3 id="create-permission-bindings">Create Permission bindings</h3>

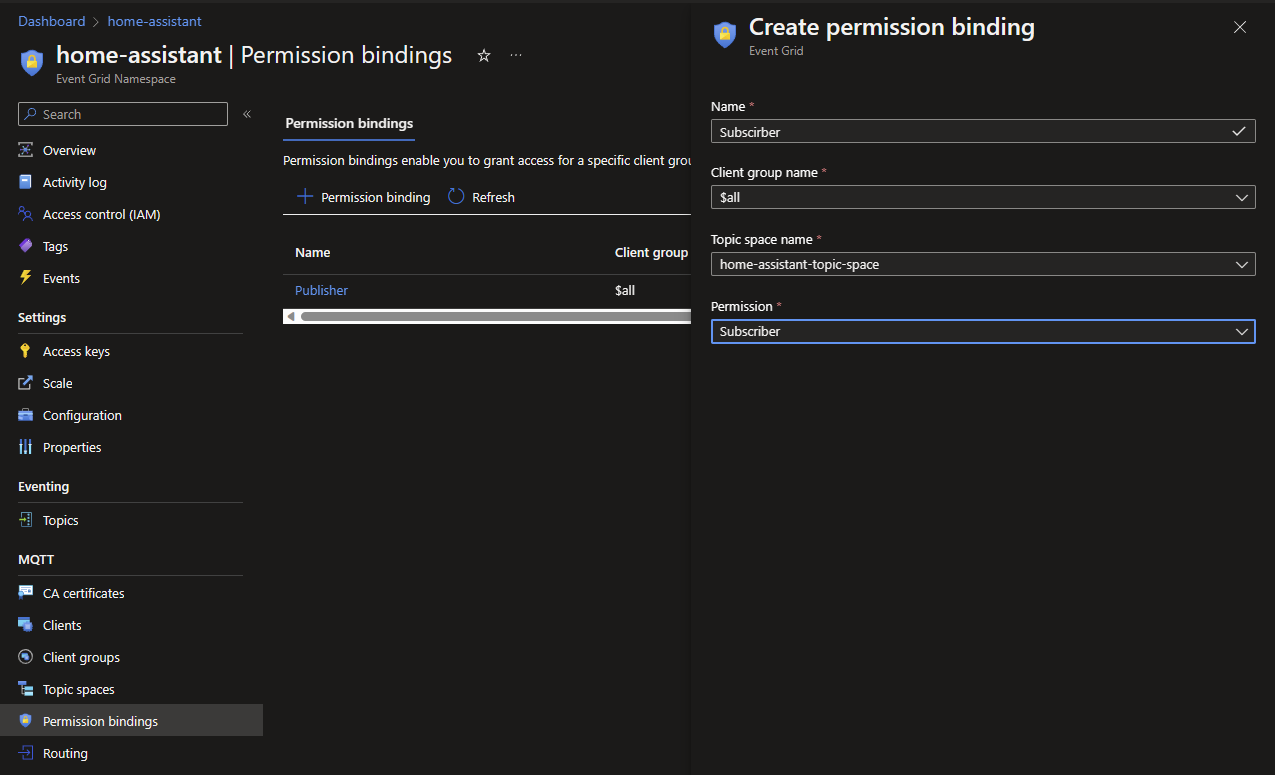
<p>Now we need to allow all clients to publish and subscribe to the topics in the Topic Space we just created. This can be done by creating a new Permission binding. Create a new Permission binding for the <code class="language-plaintext highlighter-rouge">Publisher</code> and <code class="language-plaintext highlighter-rouge">Subscriber</code> operations for “Client group name” <code class="language-plaintext highlighter-rouge">$all</code>. This will allow all clients to publish and subscribe to all topics in the Topic Space.</p>

<p><img src="/assets/images/permission-binding-publisher.png" alt="Create Permission bindings Publisher" class="image-popup" href="/assets/images/permission-binding-publisher.png" />
<img src="/assets/images/permission-binding-subscriber.png" alt="Create Permission bindings Subscriber" class="image-popup" href="/assets/images/permission-binding-subscriber.png" /></p>

<h2 id="home-assistant-configuration">Home Assistant configuration</h2>

<p>To enable Home Assistant to connect to the Azure Event Grid MQTT broker we need to configure the MQTT integration in Home Assistant. Because we need to set some advanced settings in the MQTT integration, we need to enable the <a href="https://www.home-assistant.io/blog/2019/07/17/release-96/#advanced-mode">Advanced Mode</a> in the Profile page of your account.</p>
<p><img src="/assets/images/advanced-settings.png" alt="Advanced settings in Profile page" class="image-popup" href="/assets/images/advanced-settings.png" /></p>

<h3 id="create-a-new-mqtt-integration">Create a new MQTT Integration</h3>

<p>Create a new <a href="https://www.home-assistant.io/integrations/mqtt">MQTT integration</a> in Home Assistant and configure it to connect to the Azure Event Grid MQTT broker. 
<a href="https://my.home-assistant.io/redirect/config_flow_start?domain=mqtt" target="_blank"><img src="https://my.home-assistant.io/badges/config_flow_start.svg" alt="Add MQTT Integration" /></a></p>

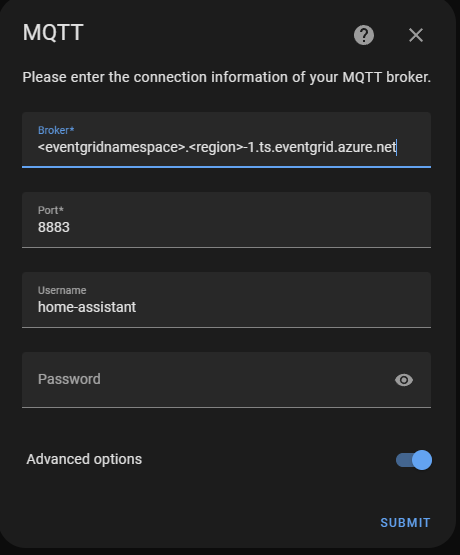
<p>Fill in the MQTT Hostname in the broker address field. Set the port number to <strong>8883</strong> and set the Username to the one created earlier. The Password filed can be left empty.</p>

<p>Enable “Advanced options” and click Submit.</p>

<p><img src="/assets/images/broker-options-0.png" alt="MQTT Options" class="image-popup" href="/assets/images/broker-options-0.png" /></p>

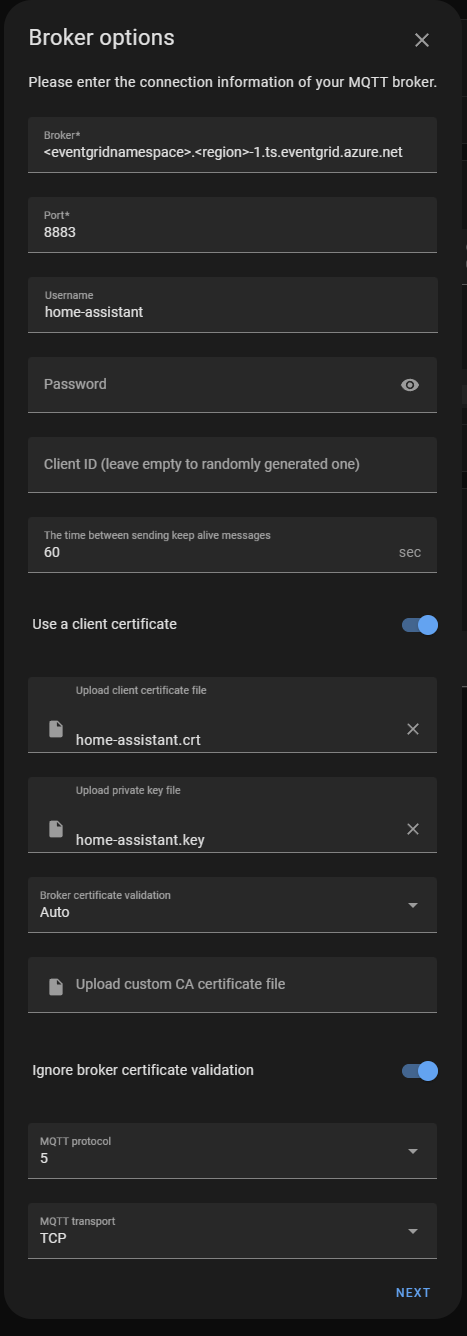
<p>Enable “Use a client certificate” and click Submit.</p>

<p><img src="/assets/images/broker-options-1.png" alt="MQTT Options" class="image-popup" href="/assets/images/broker-options-1.png" /></p>

<p>Upload the client certificate and private key that you created earlier.</p>

<p>Set “Broker certificate validation” to “Auto”. You can leave the “CA certificate” field empty.</p>

<p>Enable “Ignore broker certificate validation”.</p>

<p>Set MQTT protocol version to 5 and transport type to TCP. And click Submit.</p>

<h3 id="disable-will-message">Disable will message</h3>

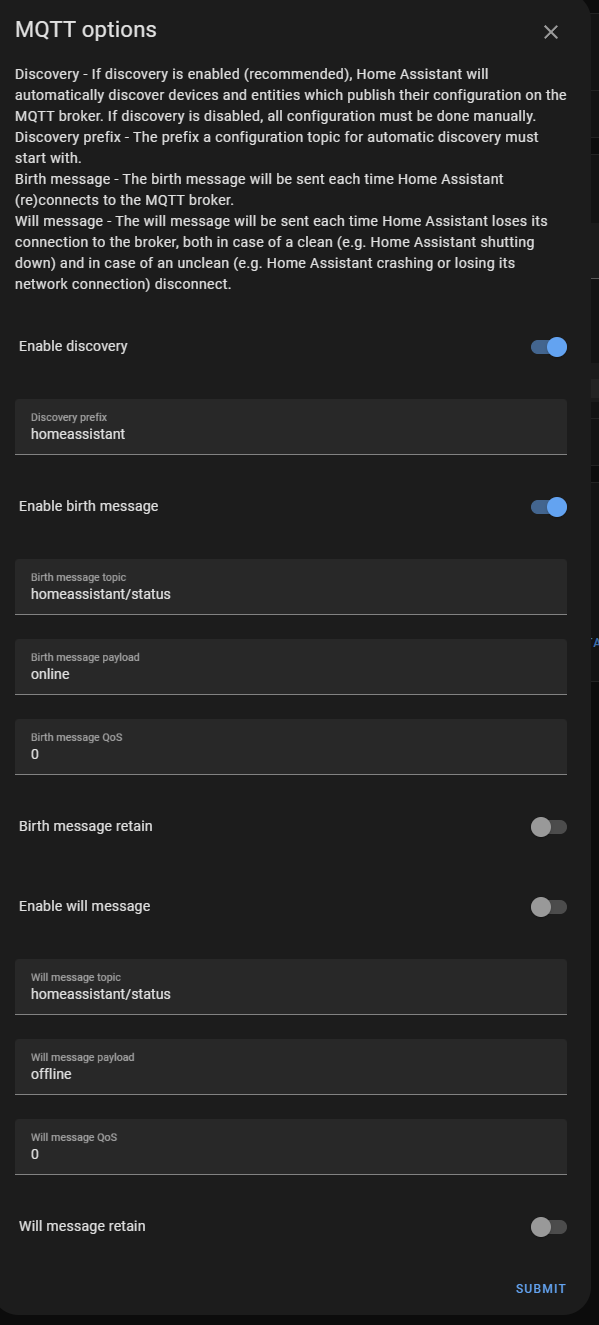
<p>On the next page, disable the “Enable will message” option. This doesn’t work with the Azure Event Grid MQTT broker. You can choose to disable the “Enable birth message” option as well.</p>

<p><img src="/assets/images/broker-options-2.png" alt="MQTT Options" class="image-popup" href="/assets/images/broker-options-2.png" /></p>

<h2 id="test-the-mqtt-connection">Test the MQTT connection</h2>

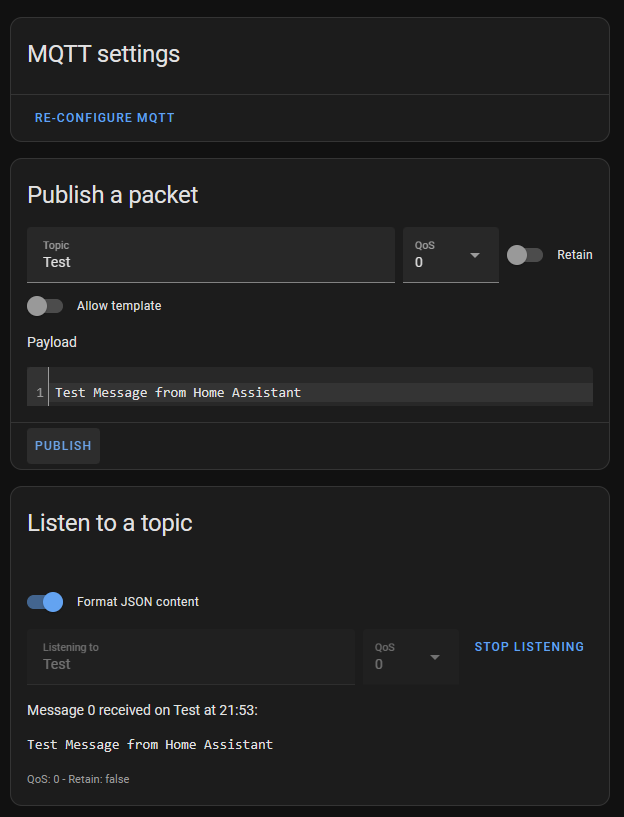
<p>You can test the MQTT connection on the MQTT configuration page. First start listening to the <code class="language-plaintext highlighter-rouge">Test</code> topic. Then publish a message to the <code class="language-plaintext highlighter-rouge">Test</code> topic. You should see the message appear in the putput.</p>

<p><img src="/assets/images/test-message.png" alt="Test Message" class="image-popup" href="/assets/images/test-message.png" /></p>

<p>That’s all folks. You can now use the MQTT integration in Home Assistant to subscribe to events from Azure Event Grid MQTT broker.</p>]]></content><author><name>Robert de Veen</name></author><category term="Azure" /><category term="Azure" /><category term="Home Assistant" /><summary type="html"><![CDATA[The Azure Event Grid now supports MQTT as a protocol for publishing events. This is great news for Home Assistant users as it allows us to connect Home Assistant to Azure Event Grid. This blog post will show you how to connect Home Assistant to Azure Event Grid using MQTT.]]></summary></entry><entry><title type="html">Pole star by night</title><link href="https://www.robertdeveen.com/photography/2023/02/27/Pole-star-by-night.html" rel="alternate" type="text/html" title="Pole star by night" /><published>2023-02-27T14:00:00+00:00</published><updated>2023-02-27T14:00:00+00:00</updated><id>https://www.robertdeveen.com/photography/2023/02/27/Pole-star-by-night</id><content type="html" xml:base="https://www.robertdeveen.com/photography/2023/02/27/Pole-star-by-night.html"><![CDATA[<p><img src="/assets/images/Pole-star-by-Night-RobertDeVeen.jpg" alt="Startrail by night" class="image-popup" href="/assets/images/Pole-star-by-Night-RobertDeVeen.jpg" /></p>

<h4 id="-robert-de-veen">© Robert de Veen</h4>

<!--more-->

<p>A composite of 70 photos from the dark sky above the Utrechtse Heuvelrug shot directly to the North. In the middle, you see the pole star and all the other stars dancing around. The straight lines are airplanes flying by and sending their Morse code to the audience on the ground. The photos were taken at 24mm, f/2.8, ISO 100, and 30 seconds. The photos were stacked and edited in Photoshop. The final image was processed in Adobe Lightroom.</p>

<h3 id="or-as-chatgpt-would-say">Or as ChatGPT would say:</h3>

<p>“The composite image capturing the dark sky above the Utrechtse Heuvelrug is a testament to the boundless wonders of the universe. It combines the natural splendor of star trails with the fleeting messages transmitted by airplanes, creating a poetic narrative etched across the canvas of the night sky. Through technical precision and creative vision, the photographer has gifted us a glimpse into the awe-inspiring beauty that lies just beyond our reach. So, next time you find yourself beneath a starlit sky, take a moment to appreciate the celestial symphony unfolding above, and perhaps, you too will capture your own unique piece of stardust.”</p>

<p>Author: <em>OpenAI’s ChatGPT</em></p>]]></content><author><name>Robert de Veen</name></author><category term="Photography" /><category term="Photography" /><summary type="html"><![CDATA[© Robert de Veen]]></summary></entry><entry><title type="html">Startrail by night</title><link href="https://www.robertdeveen.com/photography/2023/02/14/Startrail-by-night.html" rel="alternate" type="text/html" title="Startrail by night" /><published>2023-02-14T14:00:00+00:00</published><updated>2023-02-14T14:00:00+00:00</updated><id>https://www.robertdeveen.com/photography/2023/02/14/Startrail-by-night</id><content type="html" xml:base="https://www.robertdeveen.com/photography/2023/02/14/Startrail-by-night.html"><![CDATA[<p><img src="/assets/images/Startrail-by-night-RobertDeVeen-small.jpg" alt="Startrail by night" class="image-popup" href="/assets/images/Startrail-by-night-RobertDeVeen-small.jpg" /></p>

<h4 id="-robert-de-veen">© Robert de Veen</h4>

<!--more-->

<p>A composite of 50 photos from the dark sky above the Utrechtse Heuvelrug. The photos were taken at 24mm, f/2.8, ISO 100 and 30 seconds. The photos were stacked and edited in Photoshop. The final image was processed in Adobe Lightroom.</p>

<p>The man standing in the dark, that is me. I was standing there for 25 minutes in the cold and the dark. I was looking at the stars and the airplanes flying by. I was thinking about the universe and the meaning of life. No kidding, I was standing there just for 1 or 2 photo’s and then moved back out of the frame.</p>]]></content><author><name>Robert de Veen</name></author><category term="Photography" /><category term="Photography" /><summary type="html"><![CDATA[© Robert de Veen]]></summary></entry></feed>